Since there seems to be a lot of interest in / use of boleros for modesty with formal dresses, I have created a couple more web sites specifically for shrugs / boleros:
www.boleropattern.com - This web site is dedicated to sewing boleros. Right now it has the three free patterns from ModestProm.com, with more to come. There will also be full-size patterns you can print for a nominal charge. And I've started on a gallery of commercial shrug/bolero patterns, so you can see what's available in the current pattern books right from your computer (minimizing time running to the cloth store and looking through the books). I'm really excited about this site and hope to beef it up significantly over the next few months!
www.shrugclothing.com - This web site has a store where you can buy shrugs/boleros online. They are in all styles, sizes, and colors. Also good for getting ideas.
www.boleroblack.com - This web site is exclusively for black shrugs/boleros, and has a store where you can buy them online (also good for getting ideas as to various styles & what's out there).
Thursday, December 17, 2009
Wednesday, December 16, 2009
What I've Learned so Far
I have now altered approximately 20 dresses for modesty (not including all the alterations posted on the "Makeovers" section of ModestProm.com). And now I'm coming to some conclusions about the whole process. Here are my thoughts on modesty solutions, from most to least easiest.
Buy or sew a modest dress. It's really easiest and best if you can just find or sew a dress with a full bodice and sleeves in the first place. Obviously, it's less work. But there are fewer fit and coverage issues, too. Altering a dress by adding something to it, can be a tricky business. The wide straps I've been showing in these posts are harder to fit than you'd think. They almost have to be draped right on the individual girl, because the shoulder slope and shoulder width have a great effect on how they fit. They aren't a bad solution, but they still have the issue of not providing full under-arm coverage.
Buy a bolero. I think the next easiest solution, for a strapless or spaghetti strap dress, is if you can buy a bolero that works with the dress. Boleros are usually inexpensive, they come in many styles, and they have almost no fit issues. If it's the right style, it has almost no modesty issues (just have to be sure it's long enough, and that the cut in front is such that it won't show bra straps). This past formal dance that my son went to, I noticed that a lot of the girls were wearing boleros. A lot of those boleros were black. (Note: I just created a web site dedicated to black boleros, you can see it at www.boleroblack.com.)
Sew a bolero. The next easiest solution would be to make a bolero. Boleros are very easy to sew and to fit. You just have to be sure (as mentioned above) that the bolero is long enough and that it's cut right in the front, to provide the coverage needed for the dress.
Alter the dress itself. A final solution is to alter the dress itself - add sleeves, a wide strap, an inset, etc. (see examples on www.modestprom.com, under the "makeovers" section). The biggest challenge here is to find matching/coordinating cloth. (You don't have as much leeway cloth-wise as you do with a bolero, because the addition will be an actual part of the dress.) Additions right on the dress, take more skill (both design and sewing wise) than boleros do. But they can work pretty well if you can sew, and you're willing to take the time and trouble.
Monday, December 7, 2009
A Piece of Good Luck!
The biggest challenge with modesty alterations is finding appropriate cloth. It has to match or coordinate. Finding matching cloth is almost impossible, so you usually have to use a matching wrap or cut the material from somewhere on the dress (I have been cutting it off the skirt bottoms for many of these alterations).
But every once in awhile, you find a dress that has an obvious solution. This was one such dress. Notice the sash down the front (it's kind of hard to see in the picture, but it's to the right). It screams to be used.

I cut the sash off from where it was attached under the folds. I discovered, to my delight, that it was bias-cut (bias-cut is great for shoulder straps because it will stretch, thus fitting and molding to the shoulder - but bias-cut takes more yardage, and you usually can't get it when you're cutting off the bottom of a dress).
I used the sash to make a wide, pleated strap for the alteration. It was already the right width, sewn and pressed and everything, and this piece of good luck made for a very easy alteration.

Brown Dress with Bolero
This is a beautiful dress, with lovely beading all over the bodice (the picture doesn't do it justice). I snatched it up because it had a bodice (not strapless or spaghetti straps). Unfortunately, not until I got it home and looked at it more closely did I realize that it was cut to sit off the shoulder.
 The best solution I could think of for this was a bolero, and I was VERY lucky to find material that was almost an exact match at JoAnn's (this doesn't happen very often!) So I made the bolero, cutting it as short as I could, so as not to cover up any more of the beading than I had to.
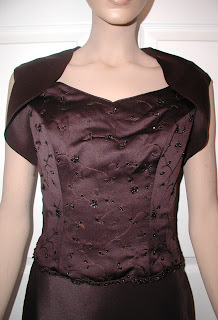 I am not 100% satisfied with this solution, however. When I get more dresses done and feel less pressure, I might loop back to this dress and see if I can find a solution that satisfies me more.
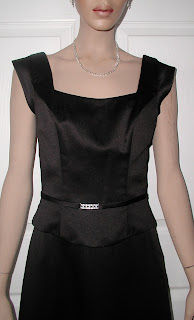
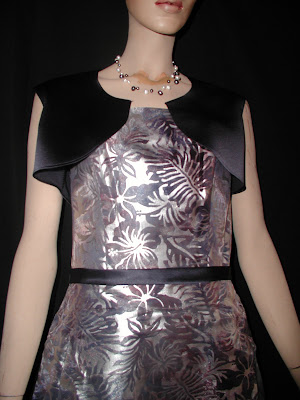
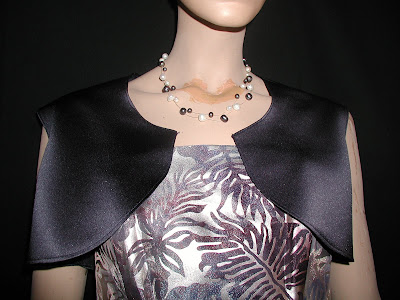
Two Black Dresses with Cap Sleeves
 These are two beautiful, understated, classic black dresses. They were both sleeveless. I added a small cap sleeve using the instructions in the "Makeover" section of Modestprom.com, except I made the "footballs" a little longer and narrower (9" x 2.5" instead of 7" by 3"). Here is the URL for the instructions:
 http://www.modestprom.com/modestmakeovers/sleevescap.htm
I should probably note that the necklines on both of theses dresses gap a little on the mannequin. If they also gap on the girls, I'm going to stitch around the inside with bracelet elastic and then pull them up a little, so they hug nice and tightly to the body (avoiding the 'I can see down to my shoes' syndrome).
Wednesday, December 2, 2009
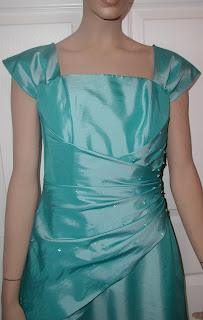
Purple dress with wide, gathered straps

Gathered straps this time, made from the dress's matching wrap:


Thursday, November 19, 2009
A Very Easy Alteration for a Spaghetti Strap Dress

This is probably the fastest, easiest alteration so far.
The dress had pretty, sparkly spaghetti straps. It seemed a shame to cover them up, so I added wide straps to the outside of the original spaghetti straps, keeping the spaghetti straps on top. Here is how I did it.
1. Cut a 4" strip off the underlayer of the dress's skirt and finished the raw (cut) edge.
2. Laid the strip over the shoulder right at the outside of the strap, putting the commercially-finished edge to the outside (exact thread and stitch match).
3. Marked the angle of the dress on the strap in the front and the back, using tailor's chalk.
4. Cut the strap along the markings, about 1" below them.
5. Serged both edges to finish.
6. Gathered the front edge.
7. Pinned the strap to the dress (draping it over the shoulder) and carefully hand-stitched in place in along the front, back, and the strap.
I was really pleased with how it turned out, but I have one concern: I'm afraid this dress is going to gap in the front, between the straps. If it does, I'm going to hand-stitch some bracelet elastic along the lining on the inside, to make it hug the body, instead of gapping forward.
One good thing about this alteration: I took the material off the lining of the skirt. The sheer overlayer stayed the original length. So I didn't have to "shorten" the dress at all. (You can tell the lining has been shortened if you know to look - you can see it a little in the picture - but otherwise, I don't think it would be obvious.)

Wednesday, November 4, 2009
Yet Another 15-Minute Bolero

As I've said before, the black bolero isn't the most sophisticated design option for a makeover. But it is quick, easy, and inexpensive - and it works better when there's some black on the dress, like this one.


Sparkly 15-Minute Bolero

The photos don't show it very well, but this 15-minute Bolero has a swirling sparkle pattern that shines with a blue cast. It looked good on this pretty blue dress, which also features a lot of sparkles, both on the bodice and throughout the skirt.


Tuesday, November 3, 2009
15-minute Bolero

The black stretch velvet bolero isn't the most sophisticated fix design-wise. But this bolero (my own pattern, drafted off a commercial pattern - the same one discussed in a previous post) took me literally 15 minutes to make. It has one piece. You cut it out and sew the shoulder seams, that's it. (I didn't even finish the edges.) For this bolero, I extended the front and the shoulders even a bit more than in the pattern discussed in the previous post, and I like it better. This bolero takes 1/3 yard of material (1/2 if you want to be safe), so it costs about $5 to make. If you need a quick, inexpensive, easy solution, this bolero is it.

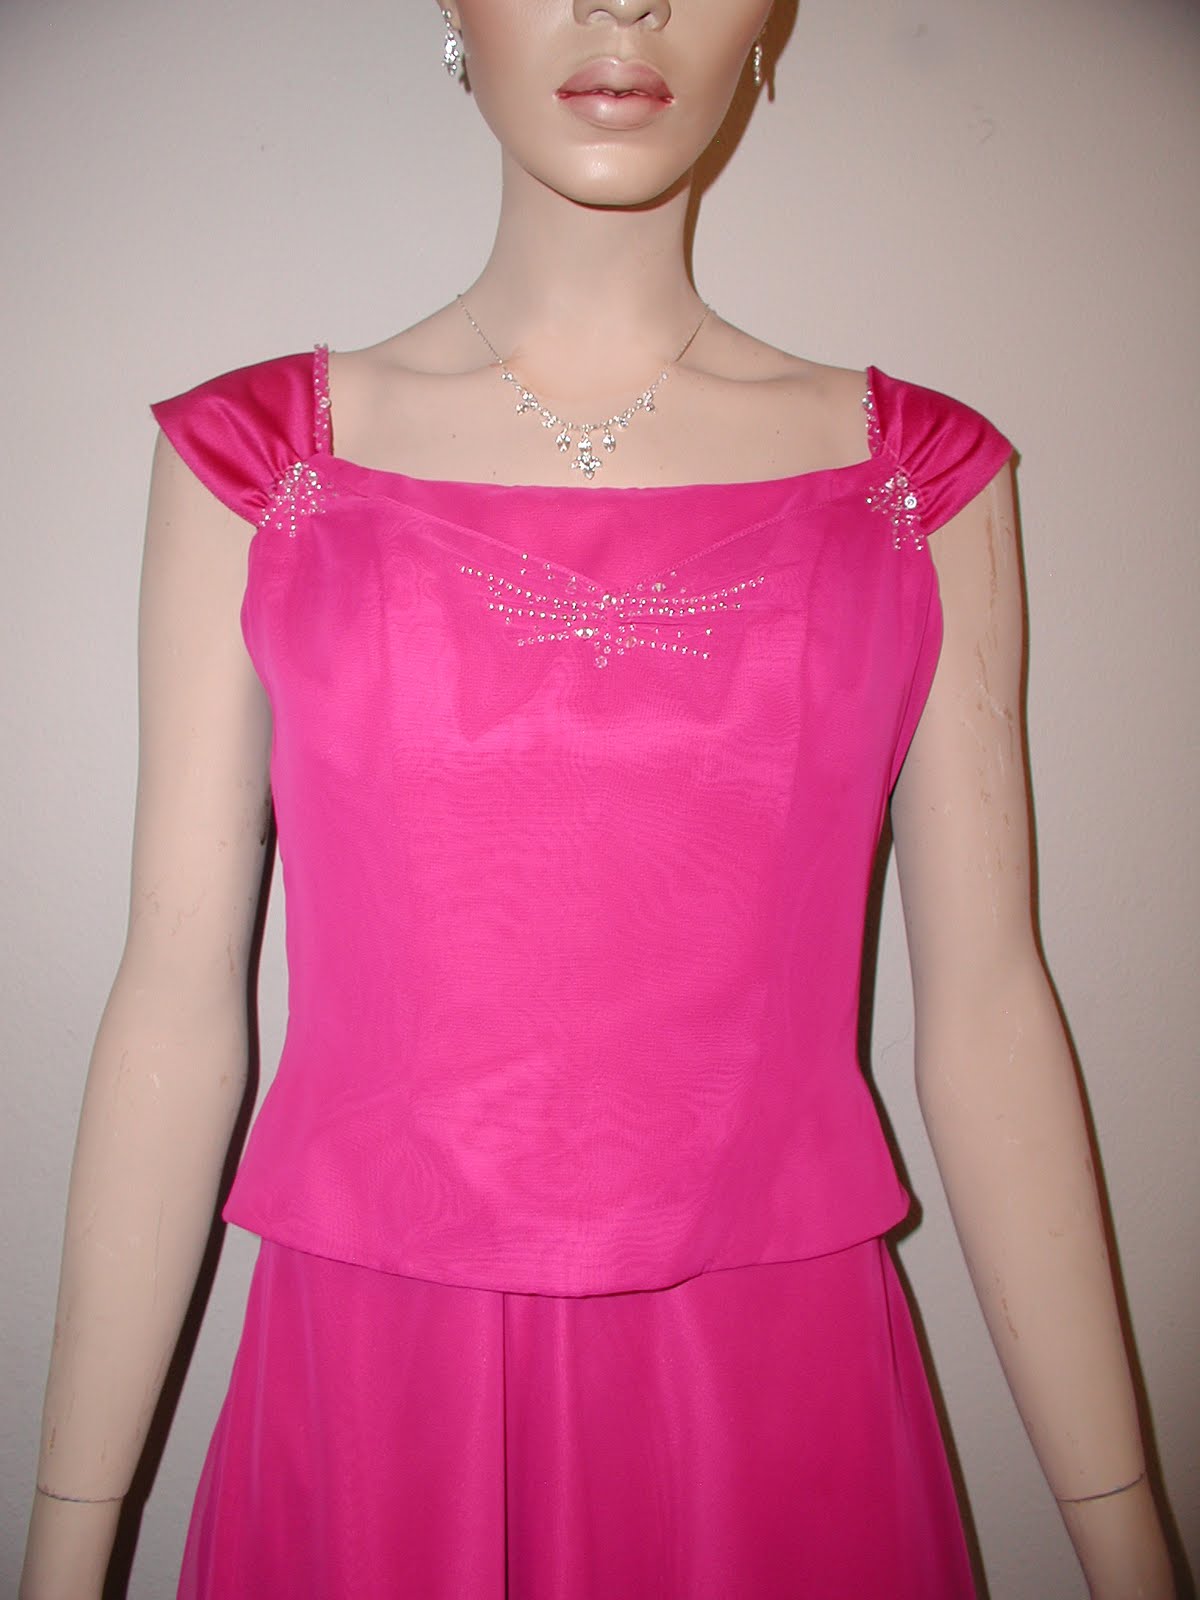
The way you detail an outfit can make a big difference in the overall look. Here I put simple rhinestone jewelry on the model, to reflect the line of simple rhinestones on the bodice of the dress.

If you want a little more bling, that works too.


Dress to Tea Length, Coordinating Bolero
Remember from the last post, that I bought two identical dresses and cut one to tea length. Here is the fix for the second dress, which is still full length. (I did it using the fabric from the first dress's slip.)
Basically, I was able to use the third layer of fabric from the skirt of the first dress, a heavy solid navy blue satin, to sew a coordinating bolero for the second dress. I think it works because it is an exact match to the blue satin at the waist of the dress. The pattern is one I drafted from a commercial pattern. The good thing about it is, although it does want to fall to the side like all boleros, the design line at the front will still provide great coverage.


Basically, I was able to use the third layer of fabric from the skirt of the first dress, a heavy solid navy blue satin, to sew a coordinating bolero for the second dress. I think it works because it is an exact match to the blue satin at the waist of the dress. The pattern is one I drafted from a commercial pattern. The good thing about it is, although it does want to fall to the side like all boleros, the design line at the front will still provide great coverage.


Dress to Tea Length, Matching Fill-In

The main reason why I got this dress was because of the unique fabric. But it was a standard strapless dress.

I knew that the fabric would be impossible to match and difficult to coordinate, so I bought two identical dresses.
I trimmed 13" off the bottom of one of the dresses, making it tea length. This was kind of complicated, because the dress had three layers of fabric: the outer shiny print, a layer under that, and a heavy satin slip.
I used the two top layers to make an insert that matched the dress exactly, using a piece adapted from a commercial pattern as my guide. I cut a layer from the top fabric and a layer from the lining fabric, sewed them together on all sides but the two straight sides, turned it inside out, and pressed it. Then I serged the two straight edges to finish them, draped the insert in place, and then stitched it down by hand to fill in the bodice. (Notice the fun gray and white pearl strings, a perfect fit for this dress!)


Easiest Bolero Ever!

Here is the easiest bolero you'll ever sew: cut one piece, sew two seams. I made it out of stretch velvet, so I didn't even have to finish the edges. (Although I know they're trendy, I am not a big fan of unfinished edges. But in this case, they worked.) The picture is picking up the texture a bit much, making the bolero look a little brown, but in real life, it is a solid midnight black.
I drafted the pattern for this bolero off of a standard commercial bolero pattern. It was very simple to do. Here are pictures:


Basically:
1. Overlap the side seam by the seam allowance.
2. Add 1" to the shoulder seam, curve it down about 1/2" on the end.
3. Raise the underarm by about 1/2".
4. Redraw the armhole.
5. I reshaped the front.
6. To sew: just sew the shoulder seams.
Monday, November 2, 2009
Black Shiny Shrug with Set in Sleeves

For this makeover, I simply sewed a bolero using Butterick B4731, view B (I purchased this pattern just a few days ago.) I sewed the bolero according to the pattern, except I extended the curve out on the bolero front.
Boleros, especially cropped boleros, naturally want to fall to the side. They have an inherent design issue in that they want to fall back just a little too much, such that they might show a bra strap right about the point where they hit the top of the dress. There are a couple of things to help here: first, make sure the dress has straps so you can pull it up high enough and it doesn't want to sink down; second, exend the front curve of the bolero in a bit, if you are sewing; third, simply safety pin the bolero to the dress in the front on each side.
The challenge with every makeover is finding cloth. I couldn't find an exact match to this dress, so I decided to use a contrast. I picked the black satin for its shine, because the dress also has a shine. Using rhinestone jewelry that is compatible with the rhinestone detail on the bodice helps to coordinate the whole and make it look more pulled-together.
Here are a few more views:


Wednesday, October 28, 2009
A ModestProject: Next Dress Makeover
Here is the next dress makeover (yes, it's a different dress):

This was also a strapless dress. By lucky coincidence, the color was an exact match to the previous dress, so I could use the same shawl for the fix.
The fix was done almost exactly the same way as the one in the previous post, except that I cut the strap narrower this time (13" instead of 14" wide), made the pleats narrower, and added another pleat (since the pleats on the dress were narrower and there were more of them, I wanted to try to make it match). After completing this makeover, I decided I actually like the strap wider, and I'm not sure if it's worth it to do multiple small pleats - it adds a lot of time and fussing, and they are harder to get even and symmetrical.
More views:


A Modest Project: First Dress Makeover!
Last time, I told you that I was starting on a ModestProject - modifying about 40 dresses to be modest. Here is my first dress makeover!

This gorgeous red dress was your basic strapless design (you can easily see where the lines of the original dress were, before I added the wide starps). But - it came with a matching shawl! Since the challenge in any makeover is to find matching/coordinating cloth, the shawl gave me some great material to work with.
The other challenge in any makeover is to work with the design of the dress, so your makeover doesn't end up looking like a bad fix that was just slapped on top. Since this dress had pleats on the bodice, I thought the makeover should have similar pleats as well.
How I did it:
* Cut two rectangles across the 17" wide shawl, 14" (rectangles ended up being 14" x 17"
* Sewed them into tubes (now they were 7" x 17")
* Pleated one end into wide pleats to match the dress
* Stitched the pleats down about 1" from the end of the rectangle
* Hand stitched the pleated end to the front of the dress
* Put the dress on my mannequin, pulled the rectangle up over the shoulder and down to the back of the dress, draped in place, adding a pleat and pulling tightly so it looked good to me.
* Hand-stitched it in place on the back of the dress as well.
This was unexpectedly fussy - there was a lot of "twiddling" - but I was really pleased with how it turned out.
Here are some more views (I ran out of batteries on the camera before I got to the back, but the back is almost exactly like the next makeover, which I'm about to post):


Friday, October 23, 2009
A Modest Project

Just this week, I had the opportunity to purchase a number of absolutely gorgeous prom dresses at an unbelievable price.
Just one problem - they are all strapless.
But I know a deal when I see one, so I got them anyway. There are enough of them to start a modest prom dress rental business, and that's what I'm going to do.
Now I have a PILE of dresses to alter. So I have my work cut out for me (no pun intended!)
Follow along while I complete this project!
Subscribe to:
Posts (Atom)